|
7/24/2023 0 Comments Origami frog instructions pdfNow fold the frog along the blue line (fold it forwards). It will now look like the image number 4 (and 5 if you flip it). Position the frog as it’s shown on the 4th image (above) and fold it backwards along the red line (you can help yourself with the ruler or a credit card etc…). These easy to follow instructions will show you how to fold a traditional origami jumping frog. 
Just click on the link to see the diagram instructions or download a printable pdf. You’ll have to fold the back of the frog twice on places indicated with the blue and red line. Origami Frog folding Instructions - Tavin WebPolyhedra. 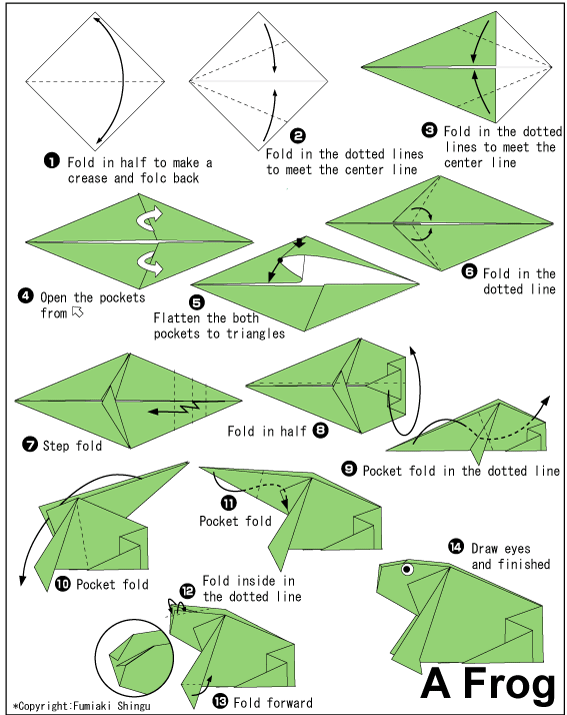.gif "origami frog instructions pdf")
Last part is a bit tricky but if you want to make your frog jump it’s a must. Flip it over – it’s slowly starting to look like a frog isn’t it? Grab the spot that’s marked with the red spot on the image above and fold it outwards. Grab the corner of the triangle (marked with the blue dot) and fold it inwards as shown on the picture above. We have a triangle again (sorry no picture of that one). Do the same with the other corner.įlip the frog. Origami Dog Instructions Origami is the Japanese art of making shapes and figures out of pieces of paper - you can ever make animals. Kids will have a blast making and playing with it. made into convenient pdf's for you Just click to download, then enjoy. Fold the right corner of the newly shaped square (marked with the red dot) towards the center of the square. Instructions: Visit for more things to make and do. This origami frog is not only easy to make, but it also jumps. Plus because it is a tradional full I release it under a innovative commons license. I used the vector graphics program inkscape to create these instructions for the frog. 
Diagram EGO really like this model to I took the time to manufacture a diagram for it. You should now have the shape displayed on the first picture above. Video Here is me howto-video on how to fold the jumping frogging. Next fold the corner of the triangle (marked with a blue spot) towards the top of the triangle. Next is a somewhat tricky part for young soon to be origami masters – you have to fold the parts that are marked with red dots on the picture above towards the center – getting them in the position showed in the photo above (you’ll get a triangle shape). Start by folding the paper diagonally (both diagonals).
0 Comments
Leave a Reply. |
 RSS Feed
